Monday, November 28, 2011

Garlands and Ornaments

I had plenty of time to crochet over the holiday weekend.
With a five hour drive, you can't do much else!
Here are some of the projects I completed during that time.

Garlands to decorate walls, windows, fireplaces and your tree!

This garland is 53 inches long with (7) 4" snowflakes.


This beautiful red garland is over 8 ft long. 
Perfect for wrapping around your tree!


Christmas Ornaments to hang on the wall,
windows, cabinets, tree and much more!


Wednesday, November 23, 2011

Snowflake Garland

It's that time of year again!  It's exciting to think about all the time we get to spend with family and friends.

This week I get to spend time with my family for several days and I can't wait to see everyone!  Well.... almost everyone!

So what I have I been working on lately?  Of course!  Snowflakes!
I'm wanting to do do something different again and this year I am starting on getting more snowflake garlands out there to sell or maybe as a gift item.


Use the garland to decorate your tree, fireplace, windows, doors, cabinets and more!


This garland is approximately 4 ft long.
Each snowflake is 2 inches across.
Additional snowflakes can be added for additional cost.


The next set of snowflakes I am working on will be a little larger ones and dainter looking!  Can't wait until I am done!  See my Etsy shop for more listings available!  www.etsy.com/shop/amykempf

Monday, October 10, 2011

Finding Inspiration

Finding inspiration can be hard at times.  You get busy with your family and it seems like everything else stops.  I recently decided that I wanted to go back to finding the things I love and doing them when time allows.

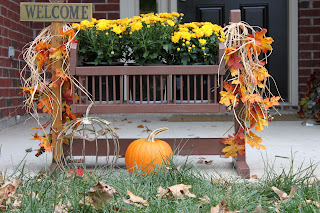
I used to love going to antique stores and flea markets.  Find that one really cool find and making it over into something amazing.  Last weekend I really wanted to decorate my front porch area to make it more inviting.  So I took off to Hobby Lobby {my favorite store} and found lots of fun and cute things.  I left Hobby Lobby empty handed because it wasn't what I was looking for.  I wanted something quaint and different.

  Something inspiring. 

I decided to stop in at a flea market in town and browse quickly through it to see if there were any goodies there.  I found something that set my mind spinning!  I found a baby doll cradle that was so cute.  Even if the color wasn't what I was wanting I still had high hopes!  I checked it out to make sure it was sturdy enough and it was.  Now, I wonder what it's price would be??  I was almost too scared to look!

$9.99.

Can you believe it!?!  I couldn't.  I snatched that bad boy up and left happy!! 

The idea I had for this cradle is simple.  I wanted to use it as a flower planter for my front porch.


So instead of having a screaming red baby cradle, I stopped by Menards and grabbed 2 cans of Chestnut paint.  Perfect!

Added to my list were 3 gallon sized yellow mums with a little hint of red in them.

After spray painting my cradle a beautiful chestnut color, it sat a day or two to dry.

Next....

Accessorize it.

I really didn't have a big plan in mind.

I picked up some leaf branches at JoAnns and attached them to the side posts with floral wire.

Added a little raffia.

It didn't seem complete so I added a little rake "Welcome" sign to the left side and attached it with floral wire in 3 different place.


While I would like to add more props around my cute little planter, I am stopping for now until I find the next great steal. 

It's easy to get stuck in a rut of creating new things.  My encouragement is this.  Find what you LOVE.  Look around at Flea markets and ask yourself how you could re-do something into something really amazing.  Pick up a few accessories that go well with it and pull it together with things you might all ready have.  You'll be amazed at the end product!

It is the planter I didn't know I was looking for!

Happy creating!


*Linked to

Monday, June 27, 2011

Fourth Of July

I have two reasons to celebrate the Fourth of July. 
Two very special reasons.
One, I never want to forget the reason our ancestors came to this country. 
Religious freedom.
Two, my son was born two days after the Fourth! 
He will be one in another week.

While time flies and it's easy to forget what is important to us, take a minute to stop and appreciate all the blessings God has put into your life.  If it's hard to be thankful, find something to be thankful for each day.  Never forget that we have what we have because of God and because of the men long ago who fought for our country.

My Fourth of July Cozy Cuddle Bunny Blanket
Free shipping on the Cozy Cuddle Bunny Blankets
now through July 4th!


Friday, June 24, 2011

Free Shipping through July 4th on Bunny Security Blankets!

Now through July 4, 2011, I am offering FREE shipping to the United States!  You have your choice any of the Cozy Cuddle Bunny Blankets in my Etsy Store and pay no shipping and handling!
Security Blanket with Velvet Chocolate Flower


How about a cream colored bunny with a beautiful Crimson Flower?


Or maybe Velvety Hot Pink is your perferred choice?

Just Visit my Etsy Store by clicking HERE!

Sunday, June 19, 2011

Fun Times!

I feel like giving a lucky winner a half off discount for one of my Cozy Cuddly Bunny Blankets!
All you have to do is help promote my Etsy Store.


What do you have to do to enter?

For each below action, I'll give you one entry.
Please comment on each entry you participate in.

1.  Blog about my give away to your readers
2.  Leave a comment about my etsy store: www.etsy.com/shop/amykempf
3.  Facebook
4.  Twitter it
4.  Buy something from my store
5.  Follow Me on this blog

I'll create a discount through my Etsy Store especially for you!
Deadline ends July 3rd!
Good luck!

Saturday, June 18, 2011

Little Girls Hand Bag

I made this little hand bag sometime in the last 6 months.  What I love about it is the beautiful colors in it.  Especially the tangerine.  The tangerine is a recycled cotton yarn.  I actually like using it for the purse that I made, as it seems more durable.


I thought the rabbit cuddle blanket I made was super cute in it!


I used a button to attach the strap to the bag. 
The button adds a little fun to the eye catching bag!

Up close and personal! 
I want people to be able to see how tight the stitches are on here.

Thursday, June 16, 2011

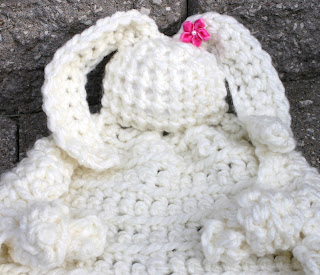
Cozy Cuddle Bunny Blanket

I decided to list this on Etsy!
It's been a long time since I have made something I feel like blogging about.  I really enjoy making something new to show others, but I am afraid since it's been so long since I posted last, I may not have anyone read this. 

Growing up I had a blanky that was my favorite.  I used to take it everywhere I go and I wouldn't sleep without it.  I always think that it is so sweet to see little one attach to something special.  I hope that this Cozy Cuddle Bunny Blanket will find a home soon.  I might become attached!
The original pattern I had gave directions for making eyes and a mouth, but I thought it was sweet without it.  I did think it needed something special to it so I stitched a flower to it.  The pattern I used was from Lion Brand.  It was alot of fun to work on! In fact it turned out a lot cuter then the pattern picture!

So what projects do you work on during the summer to pass time? 
Usually summers are much busier for me, but my son is in Summer School for a month so I am enjoying picking up my hobby again while my other one sleep.

Saturday, March 12, 2011

Making Waves-Bib Tutorial

The bib I bought for my oldest son has seen it's better days.  I hesitated to toss it because it has been a great bib!  I can't say that for all bibs out there.  What I like about it is that it snaps together at the bottom creating a catchall basin for food that drops.  Now that I have used it so many times it has finally started to fall apart.  That's a sign of true love! 

Well a couple months ago, it dawned on me when I saw someone making a bib that I too should recreate the bib I love so much! While the old one is made out of a canvas material, I decided to just grab some $1 cotton fabric swatches from Wal-Mart.  This way I can throw this one in the wash and dry it.  The canvas one you have to hang dry it.

Some of the things you will need for this are your material, thread, interfacing and snaps.

1.  Trace your pattern onto your material for a
front piece,
back piece
and interfacing piece.
Tip:  Recommend making a paper pattern so that each piece you cut is the same.
2.  Cut the front, back and interfacing pieces.
3.  Since white can be a little boring...
I took my scrapbooking cutter and made a wave design on some paper. 
Next, trace the wave pattern on the material and cut it out.
4.  With the white material and interfacing together,
 I pinned the wave material on the white backing, right sides facing each other.
5.  Stitch along the bottom edge.

6.  Fold down and press.
7.  With your sewing machine, stitch the wave down.
This will leave the raw edges showing.
8.  Next pin the top piece onto the interfacing and back piece.
9.  Sew the 3 pieces together to prevent shifting,
 when stitching the bias tape in place.
10.  Pin your bias tape.
Almost done!
11.  For your catching "tray": 
Fold up the bottom edge and stitch the edges.
12.  Add your snaps and you are done!