Saturday, March 12, 2011

Making Waves-Bib Tutorial

The bib I bought for my oldest son has seen it's better days.  I hesitated to toss it because it has been a great bib!  I can't say that for all bibs out there.  What I like about it is that it snaps together at the bottom creating a catchall basin for food that drops.  Now that I have used it so many times it has finally started to fall apart.  That's a sign of true love! 

Well a couple months ago, it dawned on me when I saw someone making a bib that I too should recreate the bib I love so much! While the old one is made out of a canvas material, I decided to just grab some $1 cotton fabric swatches from Wal-Mart.  This way I can throw this one in the wash and dry it.  The canvas one you have to hang dry it.

Some of the things you will need for this are your material, thread, interfacing and snaps.

1.  Trace your pattern onto your material for a
front piece,
back piece
and interfacing piece.
Tip:  Recommend making a paper pattern so that each piece you cut is the same.
2.  Cut the front, back and interfacing pieces.
3.  Since white can be a little boring...
I took my scrapbooking cutter and made a wave design on some paper. 
Next, trace the wave pattern on the material and cut it out.
4.  With the white material and interfacing together,
 I pinned the wave material on the white backing, right sides facing each other.
5.  Stitch along the bottom edge.

6.  Fold down and press.
7.  With your sewing machine, stitch the wave down.
This will leave the raw edges showing.
8.  Next pin the top piece onto the interfacing and back piece.
9.  Sew the 3 pieces together to prevent shifting,
 when stitching the bias tape in place.
10.  Pin your bias tape.
Almost done!
11.  For your catching "tray": 
Fold up the bottom edge and stitch the edges.
12.  Add your snaps and you are done!

Tuesday, March 8, 2011

Crafter's Niche Giveaway

Head on over to Shilah's Blog
to enter my giveaway!
Good luck!
My giveaway is this:
6 Cream snowflakes

Also: 3 snowflakes for only $5, during the month of March. 
Doesn't include shipping and handling. {$1-2 extra for S/H}

Monday, March 7, 2011

Spring Has Sprung

While it may not be Spring yet, this hat I finished makes me think about all the wonderful things Spring has to offer.  Green grass, flowers, sunshine, fresh air, long walks.  I can't wait!


The flower is different then I have done in the past, but I think I really like it.  It reminds me of a dalia and reminds me of the things yet to come.

While my crocheting has slowed down since Winter is almost over, I am hoping to keep making these hats so that in the fall I have a supply to sell at a Craft Show. 

Wednesday, February 16, 2011

Snowflakes


Winter time is one of my favorite times to crochet things, but I must confess that it has really worn on me lately.  We have had snow on the ground for almost a month now so really the idea of adding more snowflakes to my home should not excite me, but these are too cute to not to make. 

I am thankful that the weather is a lot warmer.  The snow is melting and I am so ready to see green grass, budding flowers and smell the fresh air of spring.  But before I say good-bye to Mr. Winter and say hello to Spring, I wanted to add another touch to my collection.  I came across a pattern for a snowflake garland, but I really didn't want to spend time crocheting 15 snowflakes for a Christmas Tree that won't be up for another 10 months...  so I decided to make little door hangers with each snowflake instead.  It's still Winter right?  These little snowflakes are perfect for decorating your home all Winter long. 

You can put them anywhere you want.... 

Like this:

This darling little snowflake adds the perfect accent to doors,

Close up view.

your Christmas tree,

Front Door Wreaths or even your kitchen cabinet doors!

Each snowflake is approximately 3". 

While they are not as diverse as an actual snowflake's anatomy, you can still enjoy the miraculous beauty of each one crocheted!  I am offering these darling snowflakes in a set of 3.  Each set sells for $6 per set.

Saturday, February 12, 2011

Chocolate Dipped Brownie Hearts

I am departing today from my normal crafts and blogging about something I really enjoy doing..... 

baking. 

Since it is Valentine's Day weekend, I thought I would have a little fun doing something that says "I Love You" to my family.  My husband was away for a few days for a work conference and I wanted to do something special for him when he got home. 

Thursday night I ended up baking brownies because we had family over to visit but we didn't end up eating them.  So I thought that it would be fun to use my little heart shaped cookie cutter to make brownie hearts.  But why stop there?  Why not make them even more chocolaty?  Dangerous I know.


So over my kids nap time, I cut out heart shaped brownies.


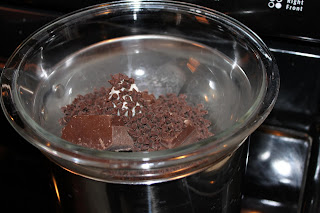
Melting Chocolate

I used left over Chocolate Almond Bark and some chocolate chips and 1/2 tablespoon of Crisco to melt my chocolate. 

Want a fool proof way to melt chocolate?  Take a pan of water several inches deep and warm it up.  Add a glass bowl to sit on top with your chocolate and stir away.  I turned down the heat once it was all melted.  This worked great for me as it didn't burn or scorch!

Looking Good!


Now just dip the brownie bits into the chocolate with a fork and tap your fork on the side of the bowl until excess chocolate drops off.  I used the tip of a sharp knife to slide it off my fork on waxed paper.


Now for a pretty presentation....
Arrange hearts on 1 paper doily on a colored plate.
Enjoy!

Thursday, February 10, 2011

Storing Patterns


Over a year ago, I started organizing my recipes that I print off or tear out of a magazine.  I was tired of shifting through all of them I had collected and wanted a way to protect them.  What I ended up doing was taking my stack of papers and inserting them into plastic paper protectors and popping them into a 3 ring binder.  They are now stored away in one location and when I get my binder out to cook I don't have to worry about spilling something on the paper and ruining a good recipe.

What started out in my kitchen then spilled on over into my crafts.  I had found some reliable patterns to crochet on web-sites that I had printed off but they too had started stacking up.  After awhile, I was afraid of them wrinkling, getting torn, or just getting lost.  What then struck me was, why not use the same idea I used for my recipe book and apply it to my craft patterns?

I have to tell you how nice it has been to keep all my paper patterns in a binder.  Now they are protected and waiting for future use.  I have also been able to just grab my binder when leaving for a trip and know that all my patterns are there if I have time to crochet while away.  I now know where they all are and don't have to waste time while rushing out the door.

I do want to offer a tip for the paper protectors.  Some patterns are more detailed then others.  Keeping track of where you are on the pattern requires you to use a paper and pencil to track your stitches.  Have you ever thought about using a dry erase marker on your paper protector?  All you have to do is write on the plastic.  When you are done, just use a tissue to clean it off.  This saves paper but also ensures you won't loose the paper while working on your project.  Just a thought...